操作系统lab1

操作系统lab1
shikiLAB1实验报告
思考题
Thinking 1.1
在阅读 附录中的编译链接详解 以及本章内容后,尝试分别使用实验环境中的原生 x86 工具链(gcc、ld、readelf、objdump 等)和 MIPS 交叉编译工具链(带有mips-linux-gnu- 前缀,如 mips-linux-gnu-gcc、mips-linux-gnu-ld),重复其中的编译和解析过程,观察相应的结果,并解释其中向objdump传入的参数的含义。
在
~/myfile目录下编写print.c程序用以输出一段字符串,分别使用gcc -E print.c和mips-linux-gnu-gcc -E print.c后比较不同可发现由于使用的工具链不同其预处理后的.c文件中的除main函数以外均有所不同。在相同目录下使用
gcc -c print.c -o print_x86.out和mips-linux-gnu-gcc -c print.c -o print_mips.out只编译不连接后再使用objdump -DS <filename>.out > <filename>.txt分别反汇编上述两个.out文件观察输出后可知采用x86原生工具链编译并反汇编后得到x86指令集的汇编代码,MIPS交叉编译工具链则产生MIPS汇编代码。链接后再反汇编二者得到的汇编代码也分别为x86和MIPS的汇编代码
使用
readelf -f <filename>指令分别解析*.out和可执行文件可得如下图所示的结果:1
2
3
4
5
6
7
8
9
10
11
12
13
14
15
16
17
18
19
20
21
22
23
24
25
26
27
28
29
30
31
32
33
34
35
36
37
38
39
40
41
42git@23371455:~/myfile $readelf -h print_x86
ELF 头:
Magic: 7f 45 4c 46 02 01 01 00 00 00 00 00 00 00 00 00
类别: ELF64
数据: 2 补码,小端序(little endian)
Version: 1(current)
OS/ABI: UNIX - System v9
ABI 版本: 0
类型: DYN(Position-Independent Executable file)
系统架构: Advanced Micro Devices X86-64
版本: 0x1
入口点地址: 0x1060
程序头起点: 64(bytes into file)
Start of section headers: 13976(bytes into file)
标志: 0x0
Size of this header: 64(bytes)
Size of program headers: 56(bytes)
Number of program headers : 13
Size of section headers: 64(bytes)
Number of section headers: 31
Section header string table index: 30
git@23371455:~/myfile $ readelf -h print_mips
ELF 头:
Magic: 7f 45 4c 46 01 02 01 00 00 00 00 00 00 00 00 00
类别: ELF322
数据: 补码,大端序(big endian)
Version: 1(current)
OS/ABI: UNIX - System V
ABI 版本: 0
类型: EXEC(可执行文件)
系统架构: MIPS R3000
版本: 0x1
入口点地址: 0x400520
程序头起点: 52(bytes into file)
Start of section headers: 67616(bytes into file)
标志: 0x70001007,noreorder,pic,cpic,o32,mips32r2
Size of this header: 52(bytes)
Size of program headers: 32(bytes)
Number of program headers: 11
Size of section headers: 40(bytes)
Number of section headers: 32
Section header string table: 311
2
3
4
5
6
7
8
9
10
11
12
13
14
15
16
17
18
19
20
21
22
23
24
25
26
27
28
29
30
31
32
33
34
35
36
37
38
39
40
41
42git@23371455:~/myfile $readelf -h print_x86.out
ELF 头:
Magic: 7f 45 4c 46 02 01 01 00 00 00 00 00 00 00 00 00
类别: ELF64
数据: 2 补码,小端序(little endian)
Version: 1(current)
OS/ABI: UNIX - System v9
ABI 版本: 0
类型: REL (可重定位文件)
系统架构: Advanced Micro Devices X86-64
版本: 0x1
入口点地址: 0x0
程序头起点: 0(bytes into file)
Start of section headers: 600(bytes into file)
标志: 0x0
Size of this header: 64(bytes)
Size of program headers: 0(bytes)
Number of program headers : 0
Size of section headers: 64(bytes)
Number of section headers: 14
Section header string table index: 13
git@23371455:~/myfile $ readelf -h print_mips.out
ELF 头:
Magic: 7f 45 4c 46 01 02 01 00 00 00 00 00 00 00 00 00
类别: ELF322
数据: 补码,大端序(big endian)
Version: 1(current)
OS/ABI: UNIX - System V
ABI 版本: 0
类型: REL (可重定位文件)
系统架构: MIPS R3000
版本: 0x1
入口点地址: 0x0
程序头起点: 0(bytes into file)
Start of section headers: 804(bytes into file)
标志: 0x70001007,noreorder,pic,cpic,o32,mips32r2
Size of this header: 52(bytes)
Size of program headers: 0(bytes)
Number of program headers: 0
Size of section headers: 40(bytes)
Number of section headers: 17
Section header string table: 16观察可得.out文件中段头表为空,可执行文件段头表不为空,且x86下的文件和MIPS下的文件在段表项数、大小,节表项数、大小,数据类型等部分均有诸多不同。
Thinking 1.2
思考下述问题:
1.
尝试使用我们编写的readelf程序,解析之前在target目录下生成的内核ELF文件。
2. 也许你会发现我们编写的readelf程序是不能解析readelf
文件本身的,而我们刚才介绍的系统工具readelf
则可以解析,这是为什么呢?(提示:尝试使用readelf-h,并阅读tools/readelf
目录下的 Makefile,观察 readelf 与 hello 的不同)
解析内核文件得到如下结果:
1
2
3
4
5
6
7
8
9
10
11
12
13
14
15
16
17
18
19
0:0x0
1:0x80020000
2:0x80022120
3:0x80022138
4:0x80022150
5:0x0
6:0x0
7:0x0
8:0x0
9:0x0
10:0x0
11:0x0
12:0x0
13:0x0
14:0x0
15:0x0
16:0x0
17:0x0
18:0x0这是因为我们编写的readelf程序只能解析MIPS32架构下的elf文件
Thinking 1.3
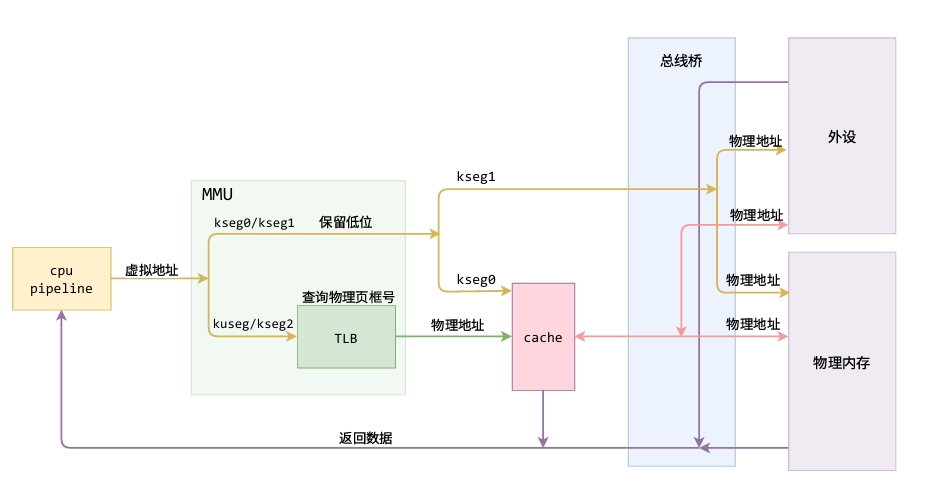
在理论课上我们了解到,MIPS体系结构上电时,启动入口地址为0xBFC00000(其实启动入口地址是根据具体型号而定的,由硬件逻辑确定,也有可能不是这个地址,但一定是一个确定的地址),但实验操作系统的内核入口并没有放在上电启动地址,而是按照内存布局图放置。思考为什么这样放置内核还能保证内核入口被正确跳转到?
- 内核启动前先执行ROM中的bootloader程序初始化各个硬件设备,然后到RAM中载入内核并通过start.S程序跳转至内存所在位置。
难点分析
在readelf实验中,需要先读取待解析的文件的地址,然后通过其中ehdr结构体访问其节头表的地址,再通过节头表项大小和索引访问其所有节头的地址
在内核加载到内存的过程中,TLB需要操作系统进行配置,且需要cache,因此需要将内核加载至kseg0区域中,再对照内存布局图即可知道内核.txt、.data、.bss段需要加载到的位置
在printk实验中,需要注意负数标记,宽度标记,long标记的初始化,否则将出现各类bug
实验体会
本次实验补全了对编译文件的链接过程的理解,认识了elf文件的段头表和节头表,同时完善了对操作系统启动过程的认识。
本次实验难点主要在于printk的编写中,需要注意各个变量的初始化,以及字符串指针的恰当移动,本次实验还需要注意将内核各个段加载至正确的位置。
原创说明
参考了往届学长的博客:https://flyinglandlord.github.io/2022/06/15/BUAA-OS-2022/lab0-lab2/doc-lab1/